

“The future of coding is no coding at all.” – Chris Wanstrath, CEO at GitHub
What if I told you that you could create your own E-commerce website without writing a single line of code!
Sounds impossible?
No jokes! It’s very much possible. You could in fact start your Complete E-commerce store today and have it ready and online by the end of the day today itself!
That’s the power of having a Shopify E-commerce Store.
As a founding entrepreneur and a problem solver, here we mention a step-by-step guide to setting up a beautiful Shopify E-commerce store without writing a single line of code! Enjoy!
Sign up on Shopify
First login to Shopify and put in your E-mail address to start and register onto Shopify.
Click here to go to the Shopify home page.
Just by Signing up on Shopify, you are granted a 14-day trial that you can use to get around and understand how Shopify works.
Choose a nice name for your business and register it here.
Introduction to Shopify Dashboard
Congratulations, you are now ready to do business. What you look at now is your basic store dashboard.
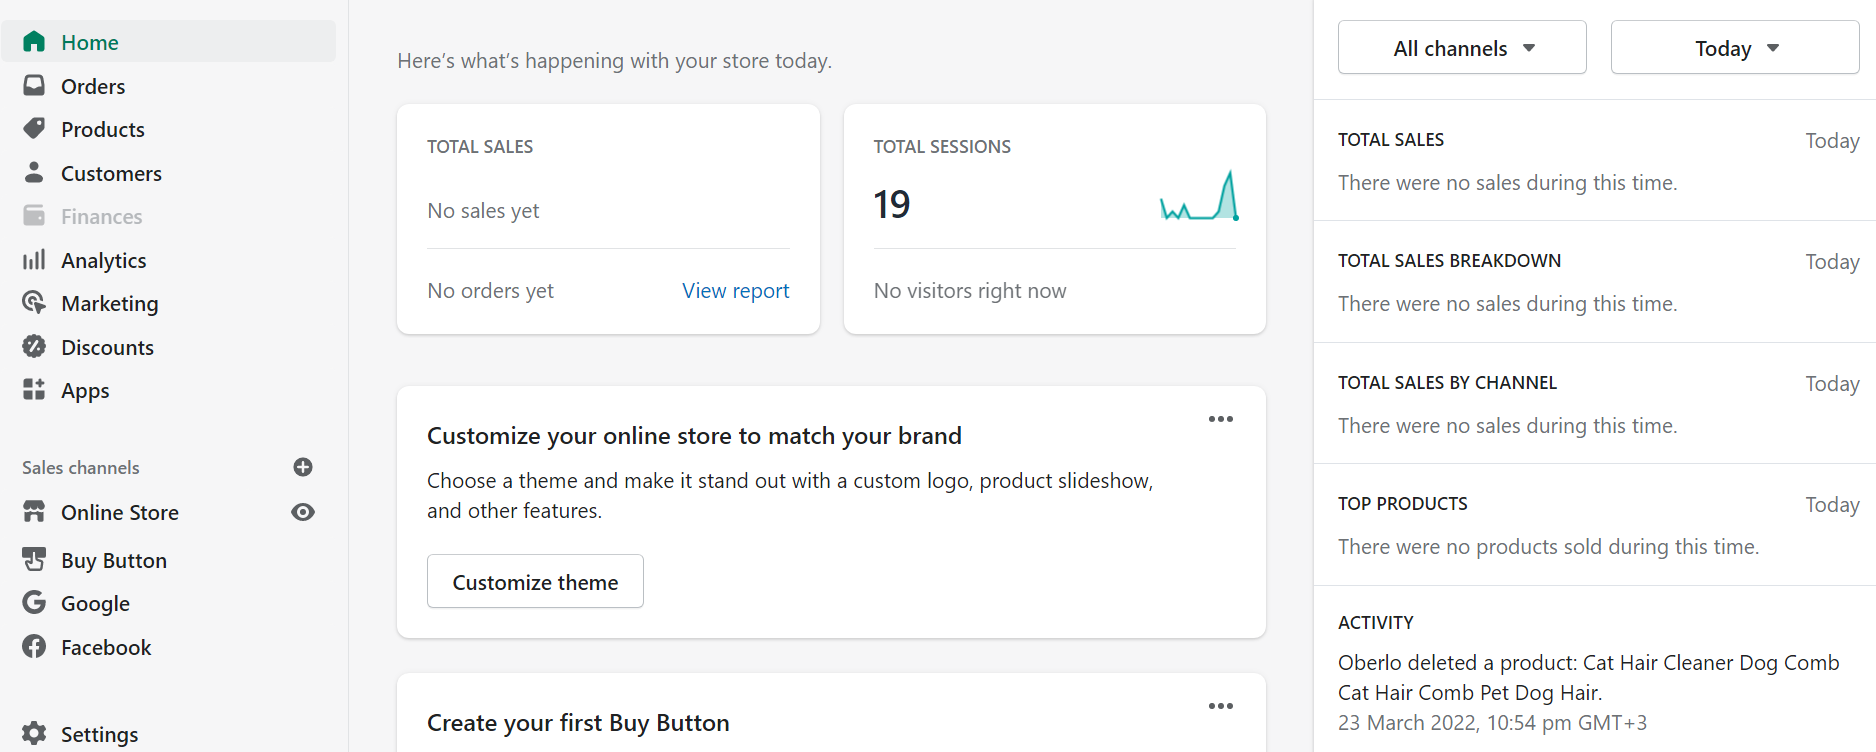
The dashboard contains the following:
→ Home Page – All status updates are shown here
→ Orders Page – Details of all orders, draft orders, and also the details of Abandoned cart Checkouts are shown here
→ Products Page – Details of all products that are uploaded. You can edit or delete from here, and also you will get details of product transfers, inventory, collections and gift cards
→ Customers Page – All customer details can be seen from here
→ Analytics Page – Analytics of dashboard, reports, live view daily, weekly or monthly wise
→ Marketing Page – Details of marketing overview of each campaign and automation and also the count of how many users are live now in-store.
→ Discount Page – Here you can set discounts on products
→ Apps Page – Details of all the apps that are listed in the Shopify App Store
→ Sales Channel – Here you can connect your store with sales channels like- POS, FB Shop, Buy Button, Messenger, Instagram, Amazon, etc.
→ Online Store – Here you will get Themes, Blog Posts, Pages, Navigation, Domains, Preferences and it will be discussed later.
→ Settings – The backend settings of the store where you can set the payment gateway, shipping, accounts and other essential sections needed for the store, this will be discussed later.
Theme or Template Selection for Designing a Beautiful Website
You can first start with a ‘thank you to yourself because today you are going to design a beautiful E-commerce website with the power of No Code / Low code. Shopify has over 100 Beautiful themes which are both free and premium. So choose your template based on your product niche. This is the design of your website.
We recommend the theme ‘Debut’ for beginners, Debut theme is one of the most powerful free themes out there.
I am also adding our step by step video here for your reference:
Adding Products to your Store
Now that your website design is ready, it’s time to add products to your store.
Step 1: Click to product Tab from Shopify Dashboard for the addition of the product and click ‘ADD PRODUCT’
Step 2: Put all the product details like Title, Description, Price, Add the images, Vendor / Brand Name, Collection, etc.
– Adding Product Variation if any (Color / Size etc )
If your product comes in variations, do the following.
Step 3: Scroll Down below click on the Variants option
Step 4: Add all the options like color, size, price accordingly, and SKU
Step 5: Save the Product by clicking the SAVE button
Step 6: Your product has been SAVED successfully.
– Add Seach Engine Optimization Information for products
-After filling in all the information about the products, scroll down below
-Add the SEO description in the description box so as to be able to search the product.
– Click the ‘SAVE’ button to save the product with SEO Info.
How to add Information pages About us, Contact Us, FAQ, Policy, etc
• Go To Shopify Dashboard → Click on Online Store → Click on Pages → Click on Add page
• Provide the Title of The Page
• Add Content for Website
• Click on ‘Edit Website SEO’ for SEO Title and Description
• Click on the ‘Save’ Button
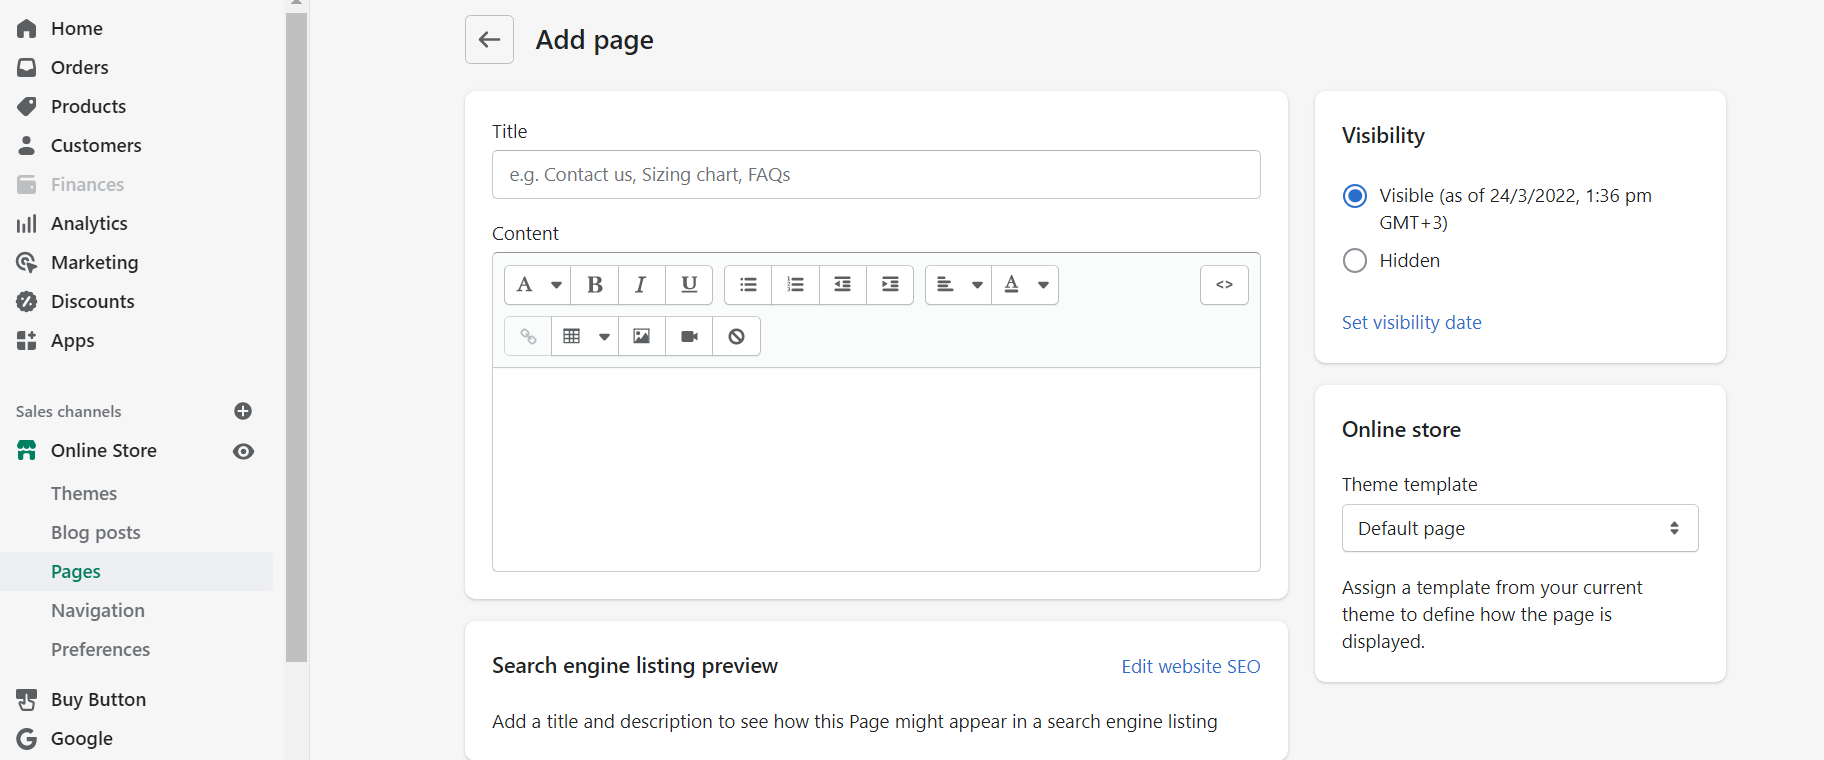
With this process, you will create different Information Pages for About us, FAQ, Privacy Policy, Return Policy, Shipping Policy, Contact Us, etc.
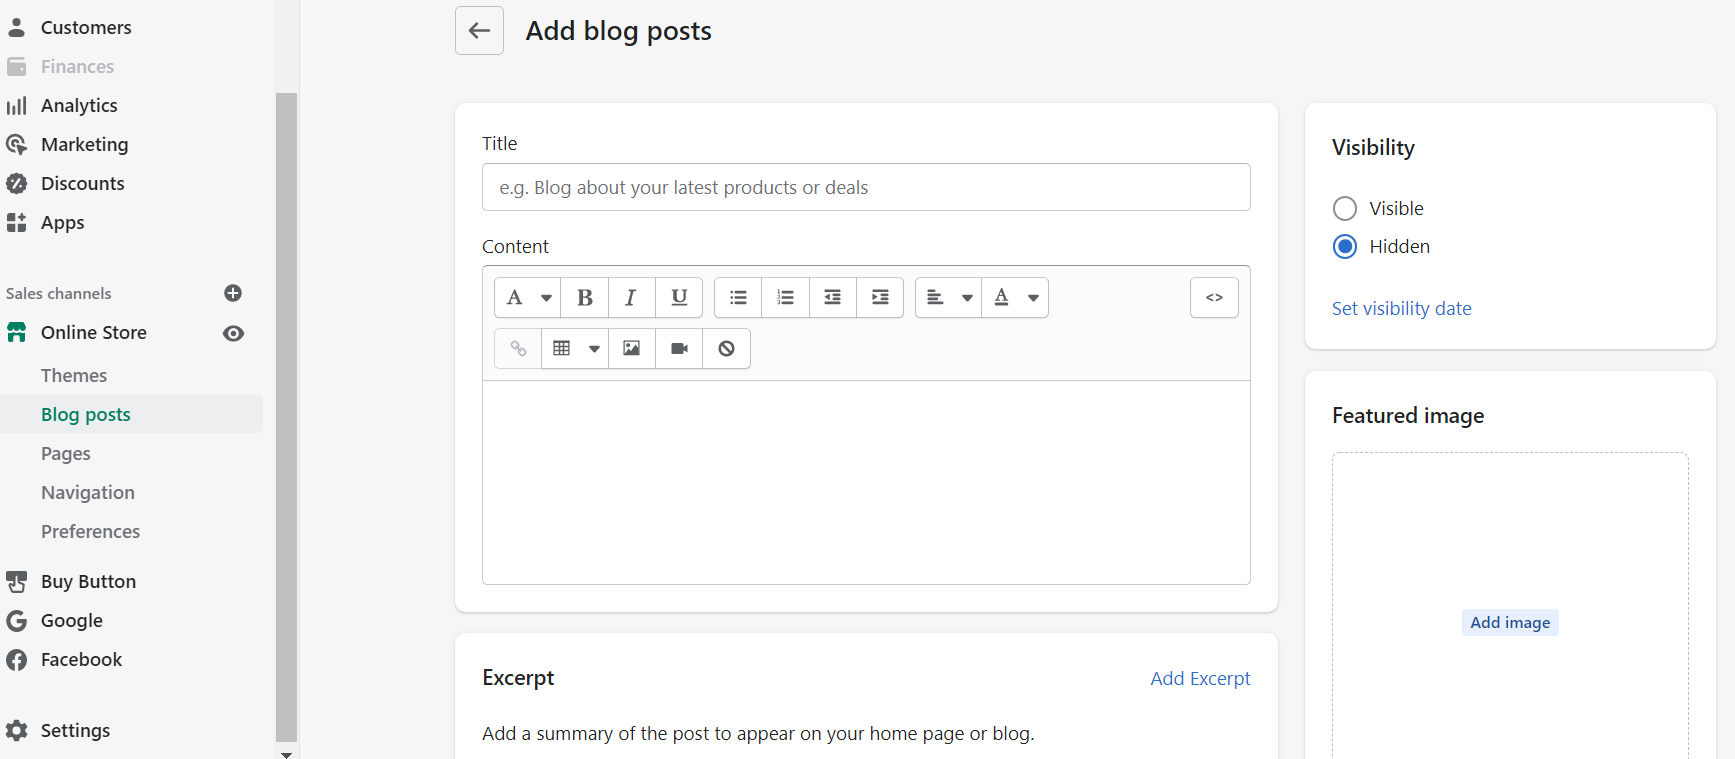
Adding Blogs to your Website
You can also add Blogs here from under the Online Store section.
– Go To Shopify Dashboard → Click on Online Store → Click on Add Blog Post
– Provide the Title of the Blog
– Add Blog Content
– Add Blog Images
Click on ‘Edit Website SEO’ for SEO Title and Description
Click on ‘Save’ Button
How to Add Collection or Category
E-commerce sites have multiple product categories.
For Example, you’re selling fashion items – Dresses – Tops, Sunglasses, etc
Step 1: Click to product Tab from Shopify Dashboard and Then Click on Collections
Step 2: Click on Create Collection and Provide Collection Name like Dress
Step 3: Provide Collections Description and Images
Step 4: Choose Collection Type: Manual or Automatic, If automatic chose conditions
Step 4: Click on Edit Website SEO: Add a title and description to see how this collection might appear in a search engine listing
How to Add Product, Collections, Pages to Navigation
1. Click on the Online Store and then click on the navigation section
2. There you can add the menu and sub-menu by clicking the ‘ADD MENU’ button
3. After creating the menu and sub-menu save it by clicking the ‘SAVE MENU’ and if you want you can delete it by clicking it by ‘DELETE MENU’
Integrate Payment Gateway
This is where the customer pays for their purchase. Keep this area simple and clean. Give the customer options.
Here are List of Payment Gateway supported by Shopify https://www.shopify.in/payment-gateways
Setting Payment Gateways:
1. In the Shopify dashboard, go to ‘Settings’ > ‘Payment Section’
2. There you can Choose Payment Gateway like Paypal, 2checkout, Shop Pay (Shopify’s personal Payment gateway), etc as per your country.
If you want you can also offer a Manual Payment option to your clients like
– Cash On Delivery and
– Bank Transfer
– Money order
Shipping
With Shopify, you can set your shipping perfectly with different carriers setting up as you want
• Flat Rate
• Free Rate
• Rates based on Weights and Prices
Go to Settings > Shipping
Add Shipping origin and zones
Add a Shipping Rate according to the Zone created. Add a Rate name according to whether it is FREE or FLAT RATE Shipping.
In case you are looking to set up a marketplace with vendors from different parts of the country, You may activate multi-origin shipping. In Shopify, you get an option to Customise the Packing Slip too.
Setting up Taxes
Go to settings and include taxes as per your country’s rules
Domain Integration
A Website built on Shopify will always end with yourstorename.myshopify.com. If you want a custom domain, you will need to purchase it from Shopify or any Domain provider like GoDaddy.
Shopify Apps
Today, there are over 6,000 publicly available apps across the Shopify App Store which include both free and premium Apps. Feel free to install the ones you feel work best for your store.
We even have an article on the Top Shopify Apps currently in the market coming up soon.
Newsletter popup for lead magnet
Install a Newsletter popup as a lead magnet (Privy App) upon the home page so new customers can register themselves onto your site and you can get in touch with them during promotional offers.
Integrate Order Tracking App
You can also go for many of Shopify’s Free and Paid apps for Shipping Solutions and Tracking Options like:
• Order Printer App
• Aftership and Tracking
• Tracktor Order Tracking
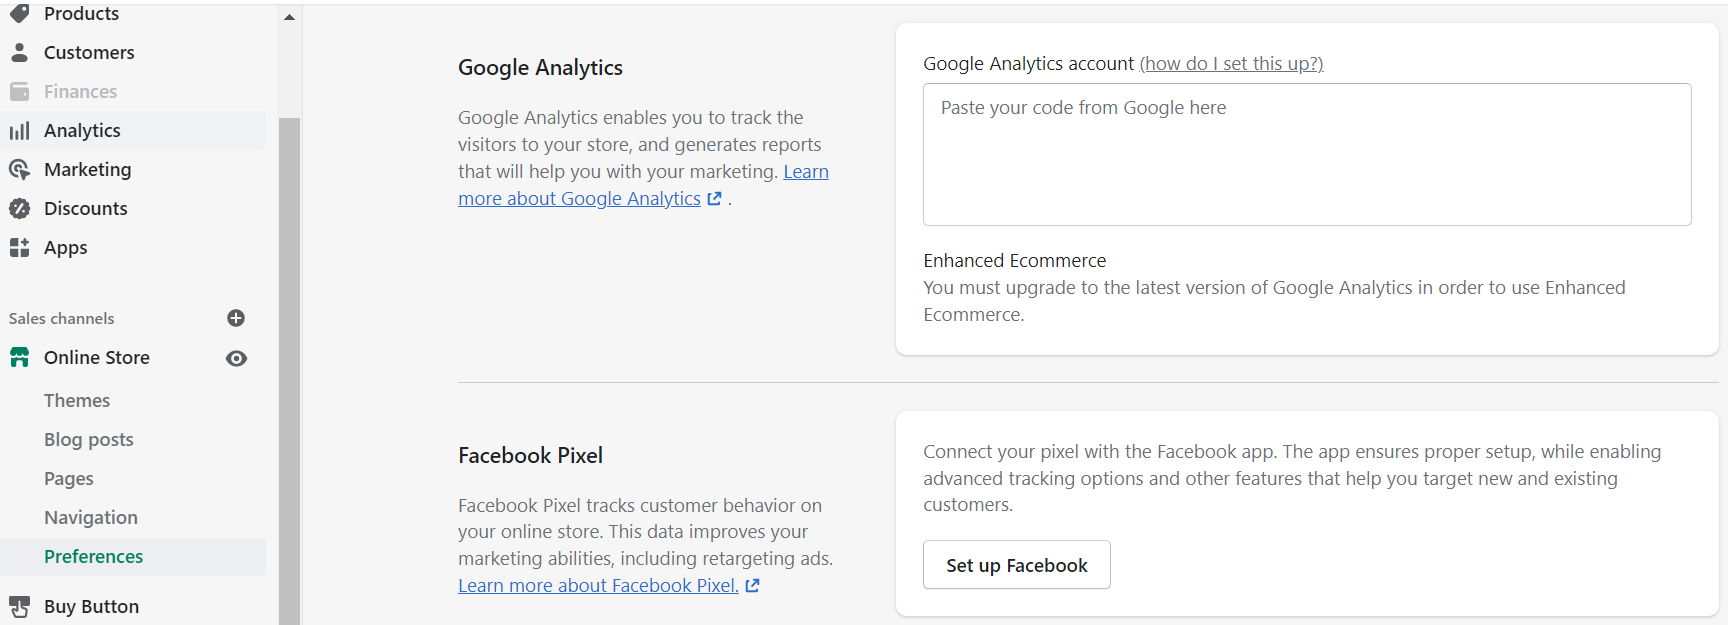
Add Google Analytics and Facebook Pixel Tracking Code
Google Analytics enables you to track visitors to your store and generates reports that will help you with your marketing.
Facebook Pixel tracks customer behavior on your online store. This data improves your marketing abilities, including retargeting ads.
For this:
Go to Shopify Dashboard – Online Store → Preference → Add Google Analytics and Facebook Pixel Tracking Code
Recommended Free and Powerful Shopify Apps for any E-commerce store
Terms and Conditions Pro+
Coupon Discount on Cart
4‑in‑1 Sticky Add To Cart
PushOwl Web Push Notifications
Privy ‑ Pop Ups, Email, & SMS
The above pointers are a step-by-step process to set up a fully functional multi-channel E-commerce Store. You might have noticed that not a single line of code was written to get this store online. This is the power of Shopify!
Shopify is built to cater to all kinds of businesses from small to large with a 99.99% Uptime. Why spend thousands of dollars creating a website when you can do it with a starting subscription of $29 on Shopify. Other platforms that don’t need coding for selling are Wix, BigCommerce, Squarespace.
It’s also true that if you want a fully customized E-commerce website with complex functionality then you should hire Shopify Experts and Developers.
If you need help from a Shopify Expert, feel free to connect with us at hi@mswebdesigner.com for further details.
As Shopify Experts and E-commerce consultants, we have helped more than 1500 + International Brands including Fortune 500 Companies to set up and scale up their online businesses.